
How to Use Go High Level Forms To Create a Freebie Opt-In
Sometimes the tech side of running an online business can feel overwhelming, but creating a simple opt-in using Go High Level forms doesn’t have to be one of those moments. If you want to use a form to gather email signups, share a freebie, or build your list, today, I’ll walk you through how to create a basic opt-in form using Subtrio (High Level). By the end of this guide, you’ll feel confident about making your form and adding it to your website.
Here’s the in-depth video tutorial for visual learners (like me, lol):
What Is Subtrio (High Level), and Why Use It for Forms?
Subtrio, also known as High Level, is a comprehensive digital platform that makes building forms super simple. It’s great for small business owners and bloggers looking to save time while creating professional tools directly integrated with their workflow. You don’t need coding knowledge, expensive software, or even years of experience. This is designed to make your life easier.
Getting Started: Creating Go High Level Forms
First thing’s first: Start by logging into your Subtrio or High Level account. From the dashboard, follow these steps:
- Navigate to the Forms Section: Look at the menu on the left-hand side and click on Sites. At the top, you’ll see an option for Forms. Hovering there will give you three options: Builder, Analyze, and Submissions.
- Choose the Builder Area: This is where you’ll create and edit forms. If you already have forms created, select Add Form in the top right corner. If your page is blank, there will be a button to Create New Form.
Starting With a Template or Blank Canvas
Subtrio (and High Level) gives you two choices: Start with a pre-designed template or from scratch. Templates are ideal if you’re not sure where to begin or you’re feeling overwhelmed. If you’re ready to customize like a pro, choose the blank option.
In this tutorial, we’ll focus on starting from scratch.
Renaming Your Form
The first thing you should do is rename your form. Click the small edit (pencil) icon at the top and give it a clear, descriptive name like “Email Freebie Opt-In Form.” This naming will be your little GPS for quickly finding forms later—no more searching through “Form 1” or “Form 2.” Trust me, been there, done that, lol.
Customizing the Layout and Style
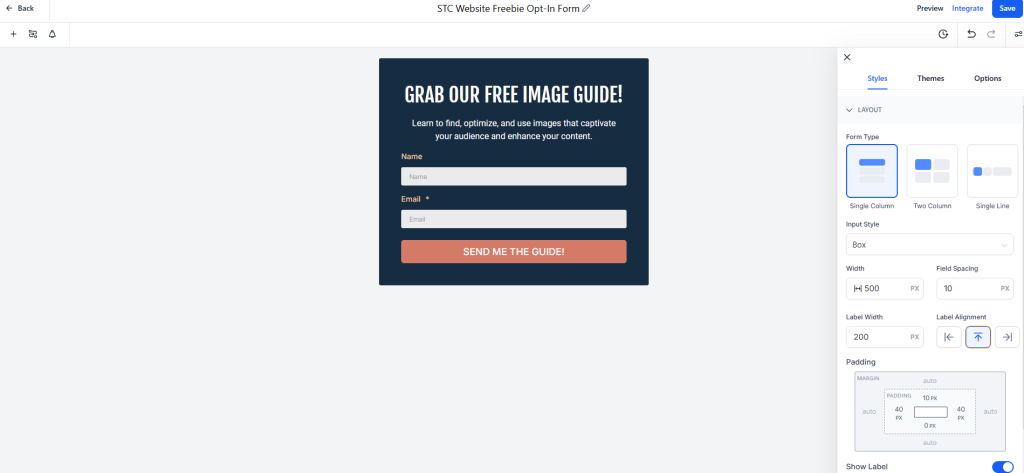
Choose a Layout That Suits Your Needs
Subtrio (and Go High Level) lets you pick from three layout options:
- Single Column: A stacked, straightforward design.
- Two Columns: Useful if you want a compact form with fields side by side.
- Single Line: Puts everything in one row.
For most opt-in forms, single-column layouts work beautifully, but you need to think ahead to where you will be using this form to decide which layout will be your best choice.
Adjust the Width
Think about where your form will live on your website. Will it be a centered section? A sidebar? On a landing page?
If it’s part of a full-width hero section on a webpage, you’ll likely want the form to take up about half or two-thirds of the page width and should set it to be around 500-700px. If you’re adding it to a sidebar, it may only need to be around 300-400px.
A picture or idea in your mind of where you’ll be putting this form and size accordingly.
Play With Colors and Fonts
Again, with the idea in your mind of where this form is going to be used, think about what colors and fonts will serve you best for it.
- Change the Background Color: Use your brand colors to make the form visually consistent with your website. Subtrio accepts eight-character color hex codes (e.g.,
#AABBCCFF, if you are using 6-character hex codes, just add “FF” after your hex code). If you want the row layout to be a solid color, you may want to set the background for your form to the same color. You can always just leave it white as well, or even make it transparent. - Pick Your Font Style and Colors: You can adjust everything from font size to weight (how bold it looks). Keep things simple but on-brand.
- Customize Labels: You can toggle labels (like “First Name” or “Email”) on or off depending on your design preference.
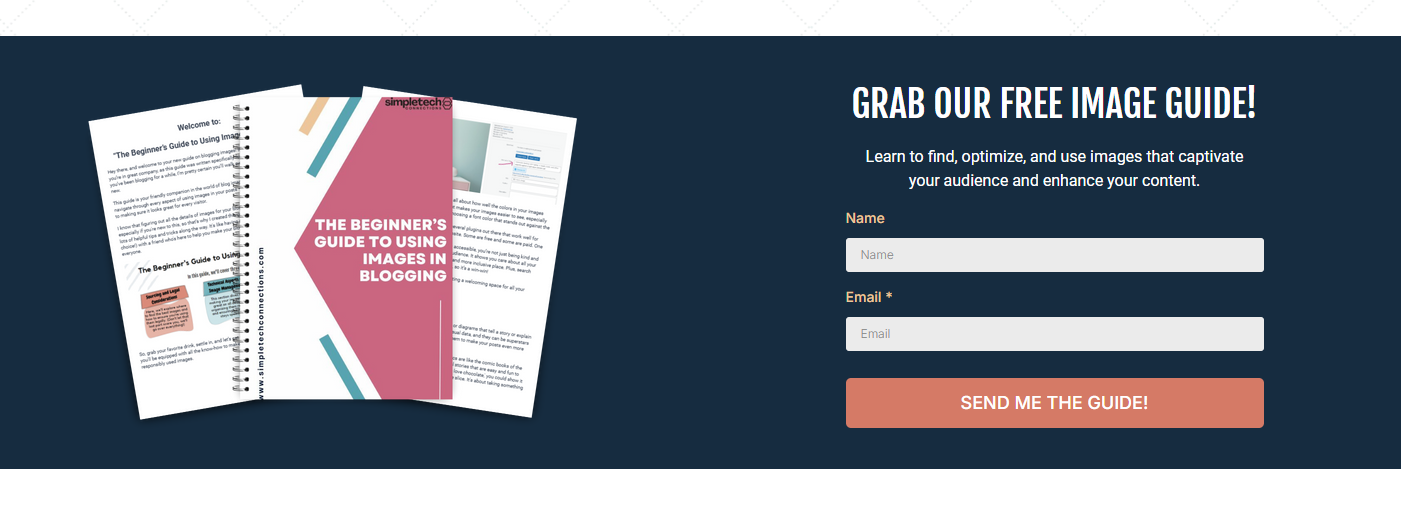
Buttons Matter
Pay attention to your button text and style—it’s what your audience clicks! Replace the default text with action-oriented phrases like “Claim My Free Guide” or “Sign Me Up!” Customize the button color and add shadows, rounded corners, or padding to match the look you’re going for.
Adding Form Fields
At the most basic level, a freebie form usually needs these:
- First Name (Optional): Some people prefer just email-only forms to keep things simple. I like to have a space for the First Name (or just Name) but not make it a required field so the user can decide how much they want to share this time around. One con to this is, though, that if you try to personalize the emails you send out, and the customer doesn’t sign up using their name, it would be blank on the emails. Just something to think about!
- Email Address: Make this field required—after all, you’re building your list! I think this is about the only absolute requirement for making this opt-in form. Everything else can be edited and tweaked to your liking, but collecting the email addresses is super important!
Subtrio lets you drag and drop to add fields. Click the “+” button on the top left corner to see all the options of things you can add to your form. Once you find the element, drag and drop it into your form. If you add something by mistake, click the field and delete it in one step using the “X”.

Feeling fancy? Here are extra fields you can add if needed:
- Phone number (for SMS options)
- Checkboxes to allow multiple choices
- Date picker if you’re scheduling events
- And so many more!
Set Notifications and Automation
Under Notifications (top left corner, little bell), you can set up email alerts for new form submissions if you want to be notified when someone submits this form.
You can also enable an autoresponder to email the person who filled out the form with the information they supplied if you’d like to make sure they have that information for future reference.
Styling the “Thank You” Message
What happens after someone submits your form? Subtrio allows you to:
- Display a Custom Message: Thank them and tell them what to expect next (e.g., “Check your inbox for your free guide!”).
- Redirect to Another Page: You could also use this opportunity to direct them to a thank you or upsell page if that aligns with your brand.
You can even style the thank-you box to match your branding, including font colors and backgrounds by toggling on the “message styling” option.
Adding the Form to Your WordPress Website
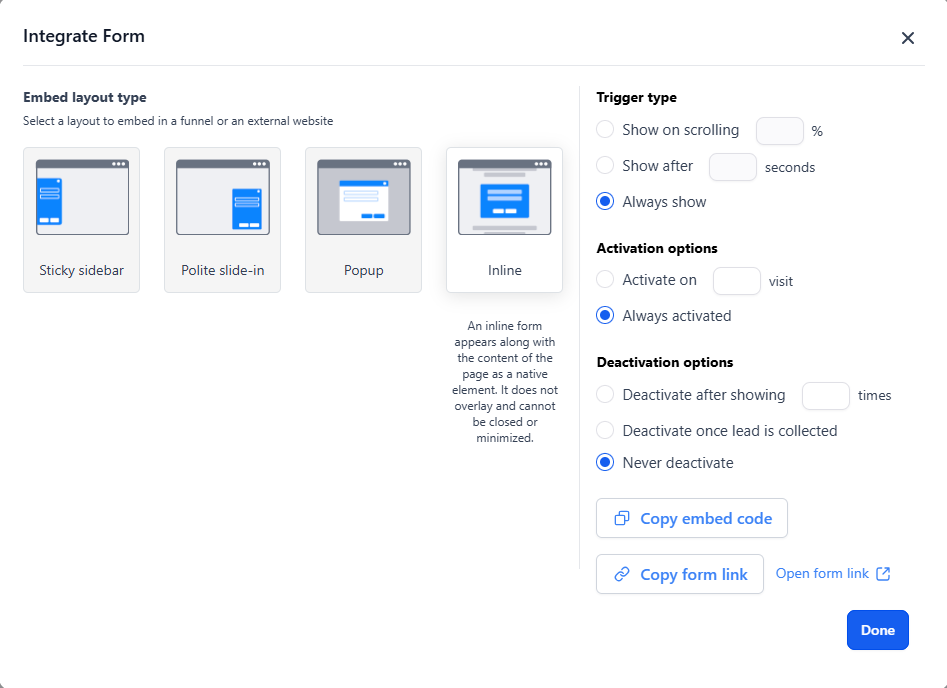
Embedding the Form
Once your form is complete (don’t forget to save it as you go along), click Integrate in the top right-hand corner. Subtrio provides an embed code—copy it. Then, navigate to your WordPress dashboard.
Here’s how to add the form to your website:
- Open the page you want to edit in WordPress.
- Click Edit Page.
- Add a new Custom HTML Block in a row layout where you want your form to appear and paste the embed code.
- Save your changes, and your form will magically appear on your site!
You’re probably thinking: “4 little steps, really??” I promise, it really is just 4 simple steps, but the in-depth video tutorial at the top of the page will help you understand this part if you have trouble with editing your WordPress website.
Be sure to preview your web page to verify that everything is showing up correctly!
Inline vs. Pop-Ups
You probably noticed that there are options to use the form as a static section on your page or set it to pop up or slide in after a user scrolls when you were in the “integrate” section. You can use any of these options, but be sparing with pop-ups—they can annoy some visitors. Inline forms, seamlessly placed on a page, are often MUCH more user-friendly.
Testing Your Form
Always, always test before publishing. Fill out the form yourself to ensure the fields work, the autoresponse sends, and your thank-you message looks right. (Free course on the whole process coming soon!)
You’ve Got This!
Creating a great opt-in form with Subtrio (or any High Level white label doesn’t require a degree in web design. With its user-friendly tools and endless customization options, you can have a beautiful, functional form live on your website in no time.
Take a deep breath, grab your coffee, and start building.
If you’re ready to try Subtrio, check out their free 14-day trial here. And if you have questions or need help, feel free to leave a comment, or join my Facebook group for tech tips and support.
